The Art of Enhancing: Contouring and Highlighting Techniques for a Stunning Look
Welcome to “The Art of Enhancing: Contouring and Highlighting Techniques for a Stunning Look.” Contouring and highlighting have become essential tools in the makeup world, allowing us to sculpt and accentuate our facial features like never before. In this blog, we will delve into the techniques and secrets behind achieving a stunning look through the art of contouring and highlighting. Whether you want to define your cheekbones, slim your face, or achieve a radiant glow, these techniques will help you enhance your natural beauty and create a flawless finish. Get ready to unlock the power of contouring and highlighting to elevate your makeup game to new heights.
Understanding Makeup Contouring: Sculpting Your Features
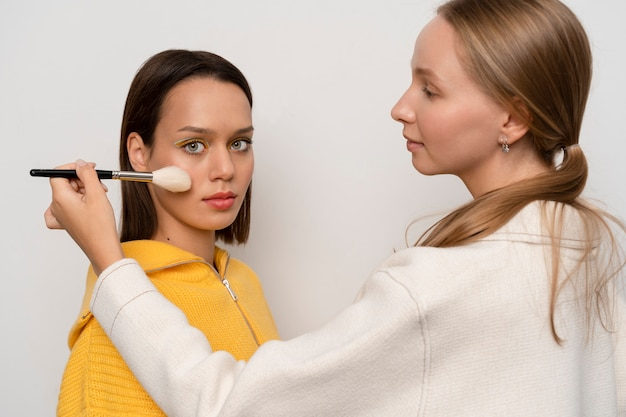
Makeup contouring is the process of using darker shades to create shadows on your face, strategically emphasizing certain areas and creating the illusion of depth. By applying contouring products such as cream or powder in areas such as the hollows of your cheeks, along the jawline, and on the sides of your nose, you can sculpt your face to appear more defined and chiseled.
To start, choose a contour shade that is one or two shades darker than your natural skin tone. Using a contour brush or a small, fluffy brush, apply the product along the hollows of your cheeks, blending it towards your temples. This will create a shadow effect, giving the illusion of higher cheekbones. Additionally, apply contouring along your jawline to add definition and slim down the face.
When contouring your nose, use a small brush and apply the product along the sides, blending it out for a seamless transition. This technique can make your nose appear slimmer or straighter, depending on your desired look.
Mastering Makeup Highlighting: Bringing Out Your Glow
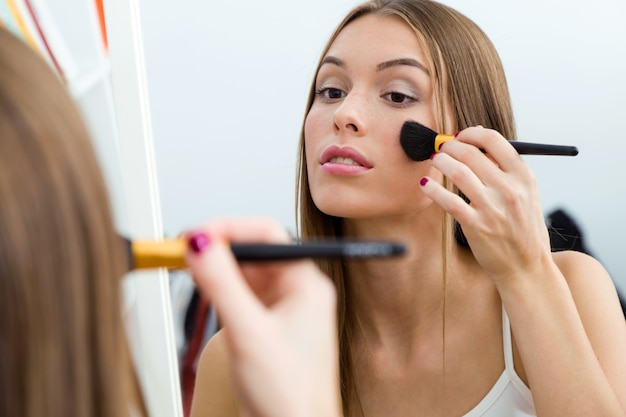
Complementing contouring, makeup highlighting is the process of using lighter shades to bring light and radiance to specific areas of your face. By strategically placing highlighter on the high points of your face, such as the cheekbones, brow bone, bridge of the nose, and cupid’s bow, you can enhance your natural features and achieve a luminous glow.
To start, choose a highlighter shade that suits your skin tone. For fair skin, opt for champagne or pearl tones, while golden and rose gold shades work well for medium to deep skin tones. Using a fan brush or a small, tapered brush, apply the highlighter to the high points of your face, where the light naturally hits.
Apply highlighter on top of your cheekbones, blending it towards your temples. This will give your face a lifted appearance and make your skin glow. Additionally, apply a small amount of highlighter on the bridge of your nose, the cupid’s bow, and the inner corners of your eyes to brighten these areas and make them pop.
The Art of Contouring and Highlighting: Tips and Tricks
Blending is key: To achieve a seamless and natural look, always remember to blend your contour and highlighter products well. Use a clean brush or a beauty sponge to soften any harsh lines and create a flawless transition between shades.
Less is more: Start with a light hand when applying contour and highlighter products. It’s easier to build up the intensity gradually rather than going overboard from the beginning. Remember, a subtle enhancement can go a long way.
Consider your face shape: Different face shapes require different contouring techniques. Research and experiment with contouring techniques that suit your specific face shape, whether it’s round, square, heart-shaped, or oval.
Choose the right products: Opt for high-quality contour and highlighter products that suit your skin type. Cream formulas are great for a natural and dewy finish, while powder formulas work well for oily or combination skin.
The Power of Highlighting: Illuminating Your Face
Highlighting is a technique that involves applying light-reflecting products to specific areas of your face to create a luminous and radiant glow. It draws attention to the high points of your face, accentuating your natural features and adding dimension. Let’s explore how to highlight your face and the best highlighting products to use.
How to Highlight Your Face
Start by choosing a highlighter shade that complements your skin tone. For fair skin, opt for champagne or pearl shades, while golden and rose gold shades work well for medium to deep skin tones.
Using a fan brush or a small, tapered brush, apply the highlighter to the following areas:
The top of your cheekbones: Sweep the highlighter along the highest point of your cheekbones, blending it towards your temples. This technique adds a lifted effect to your face.
The brow bone: Apply a small amount of highlighter just beneath your eyebrows to open up your eyes and create a youthful look.
The bridge of your nose: Gently apply highlighter down the bridge of your nose to create a slender appearance.
The cupid’s bow: Add a touch of highlighter to the cupid’s bow, the area above your upper lip. This technique accentuates your lips and creates a pouty effect.
The inner corners of your eyes: Brighten up your eyes by applying a tiny amount of highlighter to the inner corners. This trick makes you look more awake and refreshed.
The Best Highlighting Products
-
- Becca Shimmering Skin Perfector
-
- Fenty Beauty Killawatt Freestyle Highlighter
-
- Anastasia Beverly Hills Amrezy Highlighter
Contouring: Sculpting Your Features
Contouring is a technique that uses darker shades to create shadows, giving the illusion of depth and definition to your face. It allows you to enhance or minimize certain features, depending on your desired look. Let’s delve into how to contour your face and the best contouring products to achieve a stunning result.
How to Contour Your Face
Begin by selecting a contouring product that is one or two shades darker than your natural skin tone. Opt for cream or powder formulas, depending on your preference.
-
- Different face shapes require specific contouring techniques
-
- Use a contour brush or a small, fluffy brush to apply the product to the designated areas of your face. Blend well to avoid any harsh lines and create a natural-looking shadow effect.
The Best Contouring Products
-
- Anastasia Beverly Hills Contour Kit
-
- Fenty Beauty Match Stix Matte Skinstick
-
- Kat Von D Shade + Light Face Contour Palette
Finding the Best Way to Contour Your Face for Your Face Shape
Contouring is an art that allows you to sculpt your face by creating shadows and adding depth. The best way to contour your face depends on your specific face shape. Let’s explore contouring techniques for different face shapes:
Round Face
-
- Use a cool-toned contour shade.
-
- Apply the contour product along the temples, below the cheekbones, and along the jawline to create a more sculpted appearance.
-
- Blend well to ensure a natural-looking effect.
Square Face
-
- Focus on softening the angles of your face.
-
- Apply the contour shade to the outer edges of the forehead, along the jawline, and beneath the cheekbones.
-
- Blend thoroughly to achieve a seamless transition between the contour and your natural skin.
Heart-Shaped Face
-
- Create balance by contouring certain areas.
-
- Apply contour along the temples and hairline to reduce the width of the forehead.
-
- Sweep the contour shade beneath the cheekbones and blend it along the jawline for a more defined look.
Oval Face
-
- Contour lightly to maintain the natural proportions of your face.
-
- Apply the contour product to the outer edges of the forehead, gently define the cheekbones, and softly blend it along the jawline.
Discovering the Best Way to Highlight Your Face for Your Face Shape
Highlighting is a technique that adds radiance and glow to specific areas of your face, accentuating your natural features. Let’s explore the best way to highlight your face based on your face shape:
Round Face
-
- Use a luminous highlighter shade.
-
- Apply the highlighter to the high points of your face, including the cheekbones, brow bone, bridge of the nose, and cupid’s bow.
-
- This technique creates the illusion of length and enhances the structure of your face.
Square Face
-
- Soften the angular features of your face.
-
- Apply the highlighter to the highest points of your cheekbones, the center of the forehead, the brow bone, and the chin.
-
- This technique adds a touch of softness and luminosity to your face.
Heart-Shaped Face
-
- Focus on bringing balance to your features.
-
- Apply the highlighter to the center of your forehead, the brow bone, the high points of your cheekbones, and the cupid’s bow.
-
- This technique enhances your natural glow and creates harmony between your facial features.
Oval Face
-
- Highlight lightly to maintain the natural proportions of your face.
-
- Apply the highlighter to the high points of your face, including the cheekbones, brow bone, and the bridge of the nose.
-
- This technique adds a subtle radiance to your face without overpowering your natural beauty.
Contouring and Highlighting Tips for a Flawless Look
-
- The key to achieving a seamless and natural look is to blend your contour and highlight products thoroughly. Use a brush or a damp beauty sponge to soften any harsh lines and
-
- Start with a light hand when applying contour and highlight products. Gradually build up the intensity to achieve your desired look. Remember, a subtle enhancement can make a significant impact.
-
- Contouring and highlighting require practice to master. Experiment with different techniques and products to find what works best for you. Take the time to understand your face shape and customize your approach accordingly.
Contouring and Highlighting Tutorials for Beginners
Step-by-Step Contouring Tutorial
-
- Apply the contour shade to the desired areas of your face based on your face shape.
-
- Blend well using a brush or sponge to create a seamless finish.
-
- Build up the intensity gradually until you achieve the desired level of contour.
Step-by-Step Highlighting Tutorial
-
- Choose a highlighter shade that complements your skin tone.
-
- Apply the highlighter to the high points of your face, focusing on the areas that catch light naturally.
-
- Blend well to achieve a radiant and luminous glow.
Mastering the art of contouring and highlighting opens up a world of possibilities for enhancing your natural beauty. By understanding the techniques and secrets shared in this blog, you have the tools to create a stunning look that accentuates your best features. Remember, contouring allows you to sculpt and shape your face, while highlighting adds a luminous glow that catches the light. By blending these techniques seamlessly, you can achieve a flawless finish that leaves you feeling confident and beautiful. So, embrace the art of enhancing through contouring and highlighting, experiment with different techniques, and unlock the potential to create a stunning look that is uniquely yours. With practice and a creative touch, you’ll be able to transform your makeup routine and achieve the stunning look you desire.